Showing posts with label Skills. Show all posts

Monday, December 5, 2016

GET TO KNOW CAVE EXPLORING / SPELUNKING (CAVING), ADVENTURE SPORTS FOR THE ADRENALINE SEEKERS

Caves Exploring or caving is one of the branches of activity that are now starting much-loved in most countries. The landscape in the area and have various types of the geography of the land make areas our country has many natural caves. "The cave is any room under the ground that can be entered by people" according to the IUS (International Union of Speleology) about the definition of a cave. Whereas the study of caves and their environment is called speleology, which was from the Greek word that is spalion (cave) and logos (science).

Images by Google

The History Of Caving
According to the note that was ever written, search the cave first started by an expert mining and geological amateur British named John Beaumont (1674). While in development, there is someone who is very meritorious to the search field of this cave, he visited 70 of the cave, make a description in the form of maps, sketches and a thick book 2800 page, he is named Johan Valsavor of Slovenia.

Type of Cave for Caving
The cave itself is generally divided into 2 types, namely a vertical cave with the shape of the hole is perpendicular, and a horizontal cave-shaped hole is flat and elongated. While the zone in the cave, among others, is a zone of light, dusk, dark with the temperature change, and the dark with the temperature fixed (eternal dark ).

On the brightest area (usually the mouth of the cave) of light is still the same with the outside of the cave, the twilight zone is the part of the cave where light still exists but is somewhat dim as the light in the dusk, in the twilight zone, this plant can still be alive.

Read also:


In the dark zone with the temperature to change the situation is already completely dark, but the temperature here is still changing-change influenced weather and the state of the outside of the cave, while the dark zone is the deepest part of the mouth of the cave where the temperature here is always the same and does not change.


Equipment and Technique of Caving

Images by Google

In the cave exploring, required a variety of clothing and special equipment as well as techniques for the preservation of the safety and security of yourself when you do a search of the cave. For a discussion of equipment and techniques a search of the cave, this will be discussed in more detail in the discussion about the equipment and techniques of the cave exploring.

One of the techniques that must mastered especially for vertical caving is a technique SRT or Single Rope Technique. The SRT is very useful to be able to rise to the top of the surface using a rope and equipment to the ascending form of the ascender or zumar.

The rules and Ethics of caving
Last, the cave exploring has ethics that cannot be violated by the explorer of the cave. Ethics are :

Take Nothing but Picture (Not to take anything except the image)Leave Nothing but Footprints (don't leave anything behind except footprints)Kill Nothing but Time (does Not kill anything except time)
***

That's some information about one of the outdoor activities that are quite popular in most countries at this time, namely  the cave exploring. Since the start of this activity in the decade of the 1980s has much caves - new cave which has its own uniqueness in different areas.


This makes the enthusiasts and fans of this sport began to increase rapidly. The purpose of the search of the cave is also very varied ranging from travel, adventure, research, or mapping of the cave. If you are interested in trying caving? Just go out, and get your adventure!

Monday, October 24, 2016

Packing Tips For Mountaineering

Packing Tips For MountaineeringPacking of goods before setting off to climb Mount is one thing that must be done. Packing is a very vital preparation for the success of your climbing trip, when you make a mistake while packing (e.g. forgot to incorporate the important stuff), will be assured of climbing you do will definitely be getting in trouble, whether it's trouble that can still be tolerated, or it gets worse harm yourself. Therefore packing of goods is one of the stages that you should prepare very seriously and carefully.

Images by Google

Many climbers who underestimated the packing of the goods before the trip, many are doing it with a random arrangement of the organization without regard to the goods being entered into their backpacks. Whereas the position of the item in the backpack will greatly affect comfort, convenience, and stability of travel that you do. Wrong putting stuff in a backpack will make your back comfortable not as cantilever load at walking down any terrain. To avoid such things, this time the writer will give some basic packing tips for mountain climbing ascents so that you would be more convenient and easy for a living.

1. Create a checklist a list of stuff. either the equipment or the supply of foodstuffs.

Images by Google

Before doing the packing, it will be good you make a small note the checklist of all the stuff you need for your hike. Describe the most important goods ranging from up to additional items that you will use during the trip. Choose fine goods that you will carry.

Efisienlah in determining the items which you would take it if there are two items with the same function but one of them has a lighter weight, it is recommended to choose a lighter for the sake of reducing the load on your trip.

2. Use a Backpack with the right capacity.

Images by Google

After specifying all the stuff that you would take it, make sure you have a backpack with a load capacity for all your stuff. If you have only one backpack, however, is not quite fit for all the stuff you've brought, plan to try to reduce the list of stuff you with attention to functionality and the virtue of the use of the goods.

Is not forbidden to hang or tie up your rucksack outside goods if it does not fit to put in a backpack, but it will interfere with the movement of your body while climbing difficult terrain, and also in terms of aesthetics will look bad to look at.

3. Assign the goods and arrange it properly.

Images by Google

The order of items in your backpack will greatly affect the load and comfort your body movement. The wrong position of placement of goods will make your back comfortable while not bearing the burden while walking in steep terrain. Therefore consider the order of items in the picture above. Keep items such as clothes, or the lightest sleeping bag at the bottom of your backpack, and store the heaviest items in the middle part of which directly come into contact with your back.

With the right load distribution on the backpack that you take it, your body will feel more comfortable in shouldering the burden during the trip lasts. Keep important stuff like a raincoat, lighting, tools and first aid equipment at the top of the backpack or in a place that is easily accessible. This will make it easier for you if all of a sudden trip you do encounter obstacles such as rain, accidents, or other things.

The Rock Climbers Techniques

The Rock Climbers Techniques - Rock climbing activities require special techniques to be learned properly, so that climbing activities we do running smoothly and does not cause things are undesirable, for example, accidents and injuries.

Climbing technique is basically a way of putting the body in such a way so that our body is stable at the moment are at a height of. In addition, with a good climbing technique will give us the opportunity of moving and maintaining our body position with longer periods of time.

Image by  flickr.com


There are several kinds of climbing techniques which I will discuss in this article, such as:


1. Face Climbing
The technique of climbing is done on the surface of cliffs, where there's still a bulge or cliff cavity which is adequate for the footrest and handrails.

2. Friction or Slab Climbing
These techniques rely on friction as the center style which is usually done on a cliff isn't too vertical.

3. Climbing Fissure
This technique works by exploiting a gap in the rocks and use the limb as the peg. There are some techniques that are often used in climbing fissure, among them, are:
  • Jamming, to crack that is not too wide, the fingers of the hands and feet can be entered or inserted in the slit.
  • Chimneying, the techniques of climbing on vertical slits wide enough, so that the Agency can go among them and back on one side of a cliff, clinging to the cliff-side legs front and rear, both hands are also the same. Along both legs and arms move together pushed upwards and hold weight.
  • Bridging, techniques for climbing on vertical slit width with the position of the legs that straddle, legs as the object and hand Rangers the balance.
  • Lay the Back vertical crack climbing technique, hook the fingers on the edges of the slit, and the back tilted in such a way of placing both feet on the edge of the cliff opposite.
  • Hand Traverse climbing techniques, on the cliffs with moving sideways. This is done when the place an ideal grip very minimal and climbing vertical already not allowed anymore.
  • Mantel shelf, the technique of climbing a bulge-bulge hard (small terraces) that is located a bit high but can be counted on to stand up and place both hands used to draw weight assisted with the movement of the foot.


Sunday, October 23, 2016

Tips for Hiking With Ultralight Techniques

Tips for Hiking With Ultralight TechniquesUltralight hiking mountain climbing technique is fun at the same time very challenging thing to do. Reduce the burden of the backpack from the normally weighing 20 kg to 10 kg only course will certainly relieve your footsteps when stepping on every incline, speed climbing will certainly increase very rapidly, and travel time may be shortened.

Images by Pinterest.com

That's some of the benefits you can get when applying this technique. But keep in mind, reducing burdens means removing a lot of stuff from your backpack, if you want to really apply this technique, be prepared to lose a lot of luxury in your climbing trip.

Ultralight hiking technique forces you to carry only items that are really important to the safety and security of your ascent, comforts and luxuries found in other items you normally take it, automatically should you forget. That's the toughest challenge of the climb with this technique, the efficiencies have to sacrifice luxury and comfort that is commonly obtained from the climb with traditional techniques.

Ultralight Hiking - Images by Google
For those of you who are interested in trying to climb with this technique, an awful lot of preparation you have to do. Some of which I have discussed in the article on the technique of ultralight hiking. And for this time, I will supplement that information with providing some tips that can be done if you are interested in trying out climbing techniques with ultralight hiking. Here're some tips.

1. Be solidify in the choose items you would take it!

Consider with a good selection of stuff that you would take it. Note the functions and benefits of the main item that you select. If an item is considered to have not too vital functions in support of the safety and security of your hike, feel free to leave it in your home.

Remember, this ultralight engineering does not seek comfort and luxury while camping, but efficiency and safety when travel is preferred. Of course, for the first time, it will be hard to do, you will be forced to leave cherished belongings which usually always accompany and provide comfort in your previous ascent.

2. Prioritize to prefer a multi-purpose item

Multitool Swiss Army - Images by Google

One tool with many functions is the best weapon you should take it while climbing with ultralight techniques. Multifunctional items will actually reduce your load because these items one can replace many items with different functions. Multifunction knives from Switzerland's Army is the most common example of the often unreliable ultralight hikers.

3. Bring goods and groceries in the portion that is truly right

If you usually bring food and excess fuel as a backup if the other lack of anticipation, try to leave that habit. Learn from your experience to determine the number of servings of food and fuel with a right, not a shortage, and there also. Select the appropriate size carrier and bring clothes to taste. Efficiency is everything.

4. Properly Estimate the amount of water that you will bring

Water supply - Images by Google

Water is the major irreplaceable needs. Water shortage will be very dangerous for the safety of your life. But water is the heaviest items that exist in your carrier if it brings too much, certainly would be very disruptive to your climbing trip. Learn to carry water only as you need. Know any point water source at the location of your ascent. While in the source water, drink as many. To determine the amount of water that needs to take it, read it here.

5. Share the burden with travelings mate could be a surefire strategy

Equipment groups such as tents and stoves are the responsibility of each Member of the Group shared ascent, therefore, is not fair if the load must be shouldered by just one member. Share the burden evenly is a step-wise thing to do, for the sake of the efficiency of travel that you do. If the physical abilities of each Member feel the same, share the load evenly over the group that should be taken.

6. Always train your physical strength!

Physical exercise is required at least a week before climbing - Images by Google

Climbing with any technique, of course, require physical strength, ultralight hiking technique is no exception. With a lighter load than usual, not that you should ignore your body's physical strength. Within just a few kilometers, with excess body weight and physical strength are lackluster, the backpack weighing 10 kg will be felt like a bag full of boulders.

***

That's what tips do ultralight hiking we can provide to you all. If there are errors in word choice, a way of writing, and the material presented, please take the time to provide corrections and additions in the comments field.

MOUNTAIN CLIMBING TECHNIQUES: ULTRALIGHT HIKING

MOUNTAIN CLIMBING TECHNIQUES: ULTRALIGHT HIKINGMountaineers usually very identical to the big bag on the shoulders which contains a lot of travel in the form of provision of equipment and food. The amount of equipment and supplies itself depending on how long the climb will take place, the longer the journey is done, it will be more and more supplies are needed, and the weight of the load is also should be shouldered by the shoulders of the climbers.

Ultralight Hiking - Images by Google

Unfortunately, sometimes a carrier or backpack that was brought was not enough to hold all the supplies, so we must be forced to hang with some of the equipment on the outside of the carrier, or arouse some supplies in a bag Crackle in our hands. Of course, it is very annoying, because it is very disturbing when movement should pass through the steep trails climbing along the path.

Is there any way to relieve all of the usual climbing loads we carry? Of course, there are, and some time later, the technique of climbing is popular enough to be applied, this climbing technique known as the ultralight hiking.

What is ultralight hiking?

According to Wikipedia, ultralight backpacking hiking or mountain climbing techniques that are emphasized to bring equipment and supplies with minimal weight possible, without omitting important function of equipment and supplies. Standard bag weight carried (varies depending on the style of climbing and the duration of travel time) are reduced as much as possible to secure boundary can still be tolerated.

Weight is often used as the standard of reference is as follows:

-Ultralight Hiking = load carried are less than 5 kg.
-Lightweight Hiking = load carried less than 10 kg.

* For comparison, the ascent of the old fashioned way usually carry the burden with a weight of about 15 kg standards and even to reach the load weighing 30 kg.

While according to other sources, a burdens applicable standards are as follows:

-Minimalist Hiking = load brought under 6 kg.
-Ultralight Hiking = load carried is in the range of 10 kg.
-Lightweight Hiking = load brought over 10 kg up to a maximum of 15 kg.
-Deluxe Plush/Hiking = load carried above 15 kg.
Image by Google

Whether you're ready to do a climbing technique ultralight hiking?

Climb with this technique is not something that is easy to do, climbers with minimal skills and experience will be very difficult to practice in the field. Climbing with this technique really emphasized to just bring a little equipment and food without reducing the effectiveness and security of yourself while doing the climb.

Before trying to apply the techniques of this hike, the evaluation used to be yourself with honest and objective. Just ask some of these questions yourself.

1. What is the level of experience and skill to climb you have already or at least approaching the level of professional climbers?

2. Can you adapt properly while plans that you create does not correspond to the reality in the field?

3. can you improvise in overcoming any unexpected adverse events?

4. If you can sleep with a mattress and rely on the sheer sleeping bag? Or do you still need a mattress and sleeping bag to keep out the thick cold?

5. Can you eat directly from the nesting? Or do you still have to eat using a plate and a separate bowl?

6. Are you able to manage your water needs by just bringing a bottle of water? Or do you still need to carry lots of spare bottles?

7. get your climb with simple sports shoes? Or do you still need strong climbing shoes but the weight?

Nilailah ability yourself objectively, if you feel do not meet the requirements contained in the questions above, it is better do not first implement this climbing technique in total.

Rather than impose themselves in the extreme, you could probably try to start applying the techniques of ultralight by reducing the burden of climbing you normally take it gradually. For example in the next ascent, you select the items should be taken with more wisdom, leave the stuff that is not too important at home.

In your next climb began trying to replace equipment that has a heavy burden with equipment that has the same functionality but has a lighter burden.

The key to the application of the technique of climbing ultralight is making you into a simple and efficient as possible as far as you can.

***

For ultralight equipment problem, you do not need to worry, now has a lot of equipment to climb with a lighter weight for sale in the market. If you seriously want to be the ultralight climber, try to start switching from your old equipment and heavy, elaborate new equipment to the more simple and lightweight.

Because of the various equipment usually has a price of ultralight is more expensive than conventional climbing equipment, start saving to invest in such equipment. Or you can gradually by replacing your appliances one by one gradually.

That's a bit of information about ultralight climbing techniques that I can provide. The pieces of information on the above were taken from various sources. If there are errors or error writing material in the information above, please take the time to correct it by writing in the comments field. May be useful in adding insights you all.

Read the next article: Tips for Hiking With Ultralight Techniques

Wednesday, October 19, 2016

6 Guide to Streetphotography

6 Guide to Street photography Street photography so the most exciting genre to the Group traveler. Photographing every moment on the streets are need some tricks so it becomes the cooler photo. 

After Henri Cartier-Bresson (HCB) photographing the joy of children who bring two bottles of drink in a street in Paris in 1954, street photography genre began. Arguably, the photos are very natural, simple yet rich in emotions that became one of the milestones of the birth of street photography.
Street Photography - Images by Google

Decades later, the genre is increasingly sought after. No other because it can be done anytime. From the everyday route to the Office, where lectures, even while traveling. Without special permission, without fancy equipment, minus the property's supporters, as well as the Affairs of the model and lighting that sounded inconvenient.

However, the photographer of street photography remains required to bring the uniqueness and richness of the story in images it generates. Of course without loss of aesthetics and elements of beauty, of course.

Here are some basic instructions (basic guide) to get photos of the streets which have magnitude and power of strong honey in the genre of street photography.

1. Don't get too busy with technical cameras

Don't be too busy with the Affairs of the technical camera. Keep on focus on the subject, timing, and lighting. Outrageously count the technical affairs can make other things far more important missing i.e. moments and lighting.
Continuity of the subject. Of children, adult women up to seniors - Images by Google

To test it, use 3 different modes such as auto mode (program), or manual speed priority street photography while hunting. Then show it to others and ask for choose photos of it. Without being told, the resulting photo mode is different, unidentified future difficult.

2. Starting from the simple

Street photography begin from the simple past, with angle, align the eyes of adults. Set your camera to represent the view of most people's eyes. Jepretlah from the point that is not too low and not too high. This angle would bring a surprise because it could indicate something different from most people's eyes.
Keep Simple - Images by Google

avoid extreme low angle position such as frog angle or aerial view, make photos look more simple and easy to digest. Many opinions expressed, without neglecting the creative side of the photographers, extreme angle too acrobatic, unnatural and make the eyes of readers quickly tired.

Angle extreme is certainly not applicable for certain reasons such as photographing skyscrapers from the bottom, with people looking up almost 90 degrees.

Read also:
*HOW TO GET CHEAP TRAVELINGS TO EUROPE
*10 Best Most Romantic Honeymoon Destinations of All Time

3. Use photo elements as minimum as possible.

Utilizing the reflection of a mirror and side stories to enrich the subject contrast:
men vs. women, young vs. old - Images by Google

Use elements of the photo that is minimal as possible. If necessary, use negative space to create a composition that is the simple yet rich story. Suppose the play line zebra cross, then keep the focus on the element line without having to widen everywhere.

4. Pay attention to relations between the subject of the photo


If it had to record a wide range of subjects in one frame, consider the relationships between subjects. Connectivity to make photos simple though was able to steal the attention.

5. Take a contrasting subject

To record the contrasting subject, sitting vs. standing - Images by Google

Take a subject which really contrasts and basis as a young-old, rich-poor, lowercase, sit stand, left-right. The contrast value creating roles and tension were able to build characters in total.

6. The exploration of diverse Street characters

Images by Google

Exploring characteristics of various streets and not monotonous to enrich creativity photos. For example utilizing the reflection of the glass, mirror, shadow, and water. Do with proportional without exaggeration.


Definition Of Survival And Of Related Aspects

Definition Of Survival And Of Related AspectsSURVIVAL is the ability to be able to survive the conditions less favorable to Interwoven communication with outside parties. Some say that survival could be interpreted based on the letter, S.U.R.V.I.V.A. L which means:

S – Size up the situation. Pandailah in assessing the situation
U – Undue haste makes waste. Don't be in a hurry, let me slow original congratulations
R – Remember where you are. Remember where you are
V – Vanquish fear and panic. Ahold of yourself from the fear and panic
I – Improve. Use all our ability to get out of trouble
V – Value living. Appreciate life, do not leave alive with careless decision (suicide)
A – Act like the native. Adjust themselves with the surroundings (ghetto etc.)
L – Learn basic skills. Learn the basics of knowledge and practice ability in the wild

Survival - Image by Google
Read also :

Whereas, survival also involves three interrelated aspects related to people who are trying to survive in an environment. Three aspects are:

1. Psychological aspects of (panicked, scared, anxious, lonely, confused, depressed and tired)
2. physiological Aspects (hungry, sick, hungry, injured and tired)
3. Environmental aspects (hot, cold, dry and rain)

Please corrected and discussed, may be useful!

Sunday, October 16, 2016

Map - The Introduction Of A Map

Map - The Introduction Of A Map - is the depiction of two dimensions on a flat field of part or all of the Earth's surface is seen from above and reduced or enlarged by comparison. Map needed for the purposes of land navigation is a topographic map or map contours. Topographic map to map a place a place on the Earth's surface from sea level into a form of contour lines, with one contour lines, represent one height.

In a Map divided and is composed of several parts, the parts of the map, i.e.:

The Title Of The Map,
The Map Coordinates,
  • Is a pointer to a certain height (on a map usually listed the value of height) and
  • Contour lines with lower elevation contour line surrounding the always higher, except for the special fields such as the crater
  • Contour lines never intersect each other
  • The height difference between the two contour lines is fixed, although the density varies
  • Flat areas have caused a contour, while the rugged region has a dense contour
  • The ridge of the mountain/Hill visible in the map as a series of contour the shape of the letter "U" that curved edges pointing away from the Summit
  • The Valley is visible on the map as a series of "V"-shaped contours which end sharply and are set to peak
  • 1:25,000 means a distance of 1 cm on the map represents 25,000 cm distance is actually
  • 1:50,000 means a distance of 1 cm on the map represent the actual distance 50,000 cm


The location indicated by the map in question. The title of the Map is listed at the top of the middle of the Map
Map Tittle


Number Of Maps,
Number map is the registration number of the Mapmakers as a guide when we need another map of the area around the mapped area. Number of the map next to the top right of the map

The coordinate is the position of a point on a map Coordinate System axis that is specified with the lines that intersect each other perpendicular (longitude and latitude). The coordinate system knows the numbering with the number 4 or 6 numbers. For a vast area used numbering 4 numbers, and for a more narrow area with 6 digit numbers.


Contours,
Is the imaginary line connecting the dots of the same height from the sea level.  Contour line properties, among others:


The Scale Of The Map,
Is a comparison between the distances on the map with a horizontal distance in the field.
Example:


The Year Of The Map,
Indicate the year of manufacture of the map. The new year is getting Map data on the map is more accurate

The Legend Of The Map,
Contains information on the map. For example, roads, streams, settlements, etc.

Compass - ' Ground Navigation '

Compass - ' Ground Navigation 'is a tool of the signposts. The compass itself is already known since 900 years ago is proven by discovering the ancient compass used Chinese fighters around the year 1100 m. due to the nature of the magnetic traits. then the needle compass always points north and South direction (if it is not affected by the existence of the other magnet styles besides the earth magnet).
a Compass

The direction of the Compass needle is the magnetic north pole of the Earth that is located does not coincide with the Earth's the North Pole, roughly Northern Boothia peninsula in Canada, about 1400 miles or about 2250 km. But for the purposes of practical, North of the map, the compass and the North actually North/magnetic are considered equal.

According to usability and functionality the compass is grouped into three types, namely:
  1. Orientation Compass , i.e. the type of Compass used for orientation on a journey (orienteering). For example, silva compass .
  2. Viewfinder Compass , i.e. the Viewfinder used to snap the object as well as the direction we will go through. For Example, Prism Compass
  3. Geological compass, i.e. compass used to determine the direction and slope of the geological work.

Compass Parts include:
Geological Compass

  1. Agency/Body Compass i.e. the place of the attached to components of the compass.
  2. The Compass needle always pointed North-South position, however (with the proviso is not affected by magnetic fields and the needles are not obstructed cycle all its.)
  3. The compass scale, showing the Division of the degree system of the eye of the wind.

How To Use Compass:
  • The use of the compass is in principle the most important note is the compass should horizontal, then reading the scale of the map through the line of fisir, while in Compass orienteering (e.g. compass silva) is most important to note is the Northern Compass must be parallel to the North of the map.


Error factors in the corner reading the compass causes of this error include:
  1. Because of the collision with hard objects.
  2. The liquid contained in the compass jar freezes (times or weather influence), so that the compass needle or disc does not move freely.
  3. There was an error index i.e. a pointer compass readings scale index is not a straight line with signposts reading.
  4. The line of the signposts reading is not a straight line with pisir/hairline a sharp object.

Things to look for in-use of the Compass:
  1. Turn away from objects that contain a metal such as gold/machetes, knives, scissors, Victorinox, etc.
  2. Keep away from electronic items such as watches, TV, walkman, etc.
  3. Fellow compass banned each other
Techniques Use Compass
  • Before entering on a map, compass needs to know is the Azimuth and Back azimuth. Azimuth is the angle between the magnetic poles of the Earth against targets (corner of the compass) WhileBack Azimuth is the opposite of the Azimuth.
How to practice as follows: If the Azimuth < 180 ° then Back Azimuth = + 180 ° If the Azimuth Azimuth > 180 ° then Back Azimuth =-180 ° Azimuth to facilitate viewing angle on a map can use protractor (Protractor) example protractor (square): 

Emergency First Aid

Emergency First Aidis part of the adventure activities in the wild, With this activity, we trained to be ready, tough, strong, confident. At least we can give information about the State of the climate and the State of the environment to others. But behind all the adventurous hiking contains large risks, both risks of accidents even death. Less realized by the adventurous wild is the actual accidents can happen anywhere and anytime, and at the time of the incident there was not necessarily health workers around the scene.
First Aid Logo - Image by Google

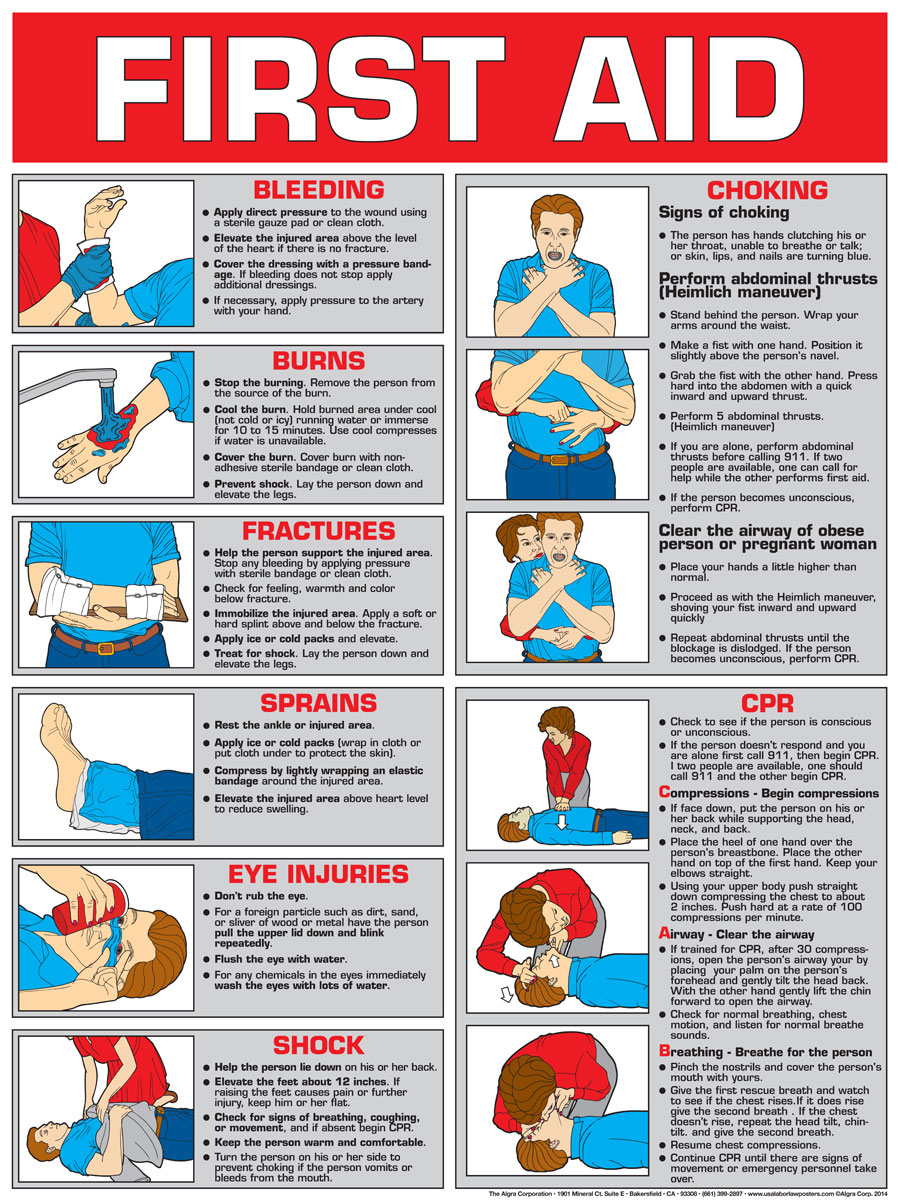
Therefore for adventurous hiking sorely need knowledge of Emergency first aid on the activities in the wild. This knowledge is helpful as basic skills (basic survival Skill) and this should be owned by every adventurer. Initial handling capability of Emergency first aid to the victims of either ourselves or others will define success. Many events in wild accidents caused by lack of knowledge or skills possessed by the adventurous itself.

This is the result of observations from various SAR operations ever undertaken. For activities in the wild many things that need to be prepared, in addition to the physical, mental preparation, equipment, and abilities will be an understanding of environment/area is required, as well as other knowledge-knowledge. One of them is an Emergency first aid in the wild. Preparation of first aid knowledge and Emergency medical supplies is one of the factors that can create safe and comfortable conditions. So in the exercise of activities in the wild adventure we should consider in advance the knowledge and medical supplies us before we do these activities.
First Aid Poster - Image by Google

As a side note in Emergency first aid should we note is the risks of danger/accident happens and if it has been classified we should be prepared and responsive in how we handle it. Ability to deal with situations of danger/accident is also sorely needed. Here we need a mental preparedness because with peace of will yield quick decisions and exact, not that we ignore because physical readiness to help victims needed a good physical because survivors is not an easy thing and there is rarely without a good physical on the helper will even harm him.

"Remember" Accidents can happen anywhere and anytime, then prepare yourself as ready as possible before you travel.

Tuesday, October 11, 2016

Navigation Skills

Activities in the wild is an activity that is fun, as we can see, enjoy, admire and learn about the natural creation of God Almighty. Reason do in wild activities, among others, as a means of sport (sport), the craze (hobby), education (education), research
(research), training (training) or just relax (refreshing) to enjoy the beauty of nature. These activities vary greatly depending on the objective, among others, mountain climbing, rock climbing (rock climbing), searches of caves (caving), rafting (rafting), diving (diving), surfing (surfing) or practice/
a practical field in the wild.
Image by Google

Things to be aware of before doing activities in the wild is preparation and planning activities, including the preparation of mature tools/supplies, health, and physical condition, the cost for activities and information about the location, path, terrain, and weather. No matter where we are headed, location whatever type of terrain traversed is, how bad the weather is encountered or how big the obstacles that come up, is not an issue which means if provided with preparation and careful planning. On the contrary when not prepared and planned in ripe, then it would cause an emergency condition so that the force we have to survive (survival) before getting help or get out of the situation and conditions is not expected. Knowledge of survival is very necessary for the ordinary activity in the wild as a "weapon" that can be used at a time when hard-pressed facing emergency conditions.

LAND NAVIGATION

Navigation is the determination of the position of  travel destinations, either on the field or on the travel map. The navigation consists of ground navigation, rivers, beaches and the sea, but the common used is ground navigation. Land navigation is the study of how someone specifies the place and provides shadow
the terrain, both the State of the surface as well as the landscapes of Earth with the help of at least a map and compass. Land navigation in the field work fundamentally is the starting point of travel (intersection and resection), mark fields, the direction of the compass, estimate distances, terrain orientation, and terrain conditions, changes in the resection and knows height somewhere.

  • Navigation tools consist of:

1. Compass is a tool to determine the wind direction based on the nature of the magnetic pole
the Earth. The main wind direction could be determined is N (north), S (south), E (east) and W (west), as well as other wind direction i.e. NE (northeast), SE (southeast), SW (southwest) and NW (Northwest).

The type of Compass commonly used are the compass, compass orientation and sylva compasses viewfinder/Prism.

2. Altimeter is a tool to determine the height of a place based on the difference in air pressure.

3. The map is an overview of some of the Earth's entire surface/on form two-dimensional by comparison to a certain scale.

4. Types of the map consist of technical maps, topographic maps, and map overview/geography/region. Parts of the map include title, number, coordinates, scale, contour, year of manufacture, the legend, and the magnetic declination.

5. GPS (Global Positioning System) is a radio-navigation system which consists of several global satellite and ground stations. Its function is to determine the location,
Navigation (specify one location towards another location), tracking (monitoring the movements of a person/object), make a map across the Earth's surface and determine the right time available anywhere.

2. Determine direction without navigation tool in addition to using the navigation tools, we can also determine the direction of the wind with the signs of natural and artificial,IE:

1. The signs of nature, namely the Sun, Moon and constellations

2. artificial signs namely mosques, graveyards and make your own compass from a magnet razor blade/needle and placed on the surface of the water

3. Flora and fauna: the more dense tree Canopies is usually located in the West of the moss Parmelia sp. and
Politrichum spp. normally live better (dense) in the western part of the forest of pandanus Plants trees usually tend to skew to the
NE Ant/insect is usually located on the West side of trees

3. Preventing and tackling the State lost
Getting lost is the loss of orientation, not knowing the actual position and the direction that will be targeted. It is usually caused due to walking at night, not quite often use a map and compass in his journey, not knowing the start point of the Chair on the map and do cut the compass.
things that can be done to prevent getting lost among other things:

Always report to officers or the person who is believed to have about the travel destination, the length and number of members
join the remember the circumstances surrounding the trip based on the five senses owned Remains are on track there has been giving instructions at each intersection of Note the striking objects such as springs, Hill, river or mountain walks never look toward the back, remember the line when viewed from the opposite direction Learn properly the navigation tools that brought use the compass before stray learn to read the signs of nature to determine the direction of the eye of the wind never trusts in full to others including to leader.

Guidelines which could be used if getting lost is S T O P, namely:

S = Seating, stop and rest at ease, relieve the panic
T = Thinking, clear thinking (logical) in a situation that is being faced
O = Observation, doing observation/observation of terrain at the site around, and then determine the direction and the signs of nature which can be utilized or that must be avoided
P = Planning, create a plan and think of the consequences when you've decided on something you will do things that can be done to

  • Tackling State of the lost are:

1. make a shelter (shelter) from danger or bad weather

2. Stay calm, not panic, think clearly and try to remember the travel lane

3. Orientation can be facilitated by heading a high/tree climbing

4. use a compass and a map (navigation tool) or natural indicators

5. create the instructions to make the other person look for our existence, for example, by writing, whistle, smoke, x-rays or a shout

6. Keep it together with the group in any condition

7. Capitalize on the situation by waiting for reinforcements,

Wednesday, October 5, 2016

Final Thoughts and Recipes

Final Thoughts and Recipes - All and all I think this was an incredible learning opportunity that turned out excellent. Being that this was my first time making these homemade dried meals I still think it was a resounding success

As much as I would like to think I made this all up myself, I stand on the shoulders of giants.

I found a lot of ideas and inspiration from a number of websites, including The Yummy Life, Wild Backpacker, and Trail Recipes.

Below I’ve listed a few of the recipes I used. Note that these are single serving recipes meant for a hot meal after a long day of hiking. Adjust ingredients as necessary.

Combine all dry ingredients into a ziplock or similar plastic bag. When on the trail simply boil the appropriate amount of water and add to bag. Stir thoroughly and let sit for 5 to 10 minutes, then enjoy. Alternatively, you can add the contents of the meal to your stove and boiling water if that works better for your setup.

Fiesta Chicken
Fiesta Chicken - Images by Google

  • 2/3 cup instant brown rice
  • 1 teaspoon chia seeds or ground flaxseed (optional)
  • 1/3 cup freeze dried chopped chicken
  • 1/2 cup freeze dried corn
  • ¼ cup freeze dried chopped tomatoes
  • 1/4 teaspoon dried minced jalapeno
  • 1 tablespoon freeze dried onions (or 1 teaspoon dried onion flakes)
  • 1-1/2 teaspoons powdered chicken flavor base (or boullion granules)
  • 1-1/2 teaspoons chili powder
  • ¼ teaspoon cumin
  • 1/4 teaspoon dried oregano (Mexican preferred)
  • 1/2 teaspoon freeze dried cilantro (or 1/8 teaspoon dried)
  • ¼ teaspoon garlic powder
  • 1/8 teaspoon ground black pepper
  • ¼ teaspoon salt (or more to taste)
  • 1-1/2 cups water

Creamy Chicken Alfredo

Creamy Chicken Alfredo -  Images by Google

  • 1 cup pasta broken in 2”pieces (use pasta that normally cooks on stovetop in 4 min. or less—thin egg noodles, angel hair pasta, or quick-cooking artisan pastas)*
  • 1 teaspoon chia seeds or ground flaxseed (optional)
  • ¼ cup freeze dried chopped chicken
  • ¼ cup toasted pine nuts
  • ¼ cup freeze dried chopped mushrooms
  • 1-1/2 teaspoons powdered chicken flavor base (or boullion granules)
  • 3 tablespoons grated Parmesan cheese (the dried, unrefrigerated kind in a can)
  • 2 tablespoons instant dried buttermilk powder (or regular powdered milk)
  • 2 tablespoons corn starch
  • 2 teaspoons freeze dried Italian herb blend (or 3/4 teaspoon dried Italian herb blend)
  • ¼ teaspoon garlic powder
  • 1/8 teaspoon ground black pepper
  • ¼ teaspoon salt (or more to taste)
  • 1-1/4 cups water


Thai Peanut Noodles
Peanut Noodles - Image by Google

  • 1 cup pasta broken in 2”pieces (use pasta that normally cooks on stovetop in 4 min. or less—thin egg noodles, angel hair pasta, or quick-cooking artisan pastas)*
  • 1 teaspoon chia seeds or ground flaxseed (optional)
  • ¼ cup freeze dried chopped chicken
  • ¼ cup chopped roasted peanuts
  • ¼ cup freeze dried mixed vegetables
  • 1-1/2 teaspoons powdered chicken flavor base (or boullion granules)
  • 2 tablespoons PB2 powdered peanut butter
  • 1-1/2 teaspoons freeze dried cilantro (or ½ teaspoon dried cilantro)
  • ¼ teaspoon garlic powder
  • ¼ teaspoon ground ginger
  • pinch of ground cayenne pepper (or more if you want it spicier)
  • 1/8 teaspoon ground black pepper
  • 1/4 teaspoon salt (or more to taste)

Article by Thomas Freeman

Prepare Homemade Backpacking Meals

Prepare Homemade Backpacking Meals Eating in the wilderness is paramount to survival, but it’s also one of the traditions that keeps people from spending long nights in the woods. Most think the food just isn’t that good.

There are two truths:
  1. After hiking 8-plus miles, everything tastes good.
  2. You can prepare homemade backpacking meals to get the exact meal you want.

When it comes to backpacking, preparing and eating meals can be a bit of a task. While car camping has the conveniences of ice-filled coolers, plates, silverware, and propane grills, backpacking does not have these luxuries.

Eating in the wild includes its own set of requirements, such as food storage without refrigeration, having as little trash and cleanup as possible, and preparation without a full stove top. The most common option is to bring prepackaged freeze dried foods for your meals. There are a number of companies that produce such meals.

While these are very easy to use and handy to have around, there are a few issues with them:
  • Large amount of trash after eating. (Always remember to Leave No Trace!)
  • You are limited to their selection of meals.
  • The extremely sharp edges of the plastic can actually damage the backpacks they are stored in.
In March of 2016 I was fortunate enough to be offered an internship working with a name brand tech company on the west coast. Since I live in Florida, the plan quickly became to drive across the U.S., with its endless opportunities for incredible backpacking through some of the country’s most amazing National Parks and forests. In preparing for this trip one of the main concerns besides picking trails and getting permits was the preparation of food.

While I had originally thought that I would just buy a bulk order of pre-packaged freeze dried meals, the reasons above encouraged me to find an alternative. Enter homemade backpacking meals.

Creating these meals has a number of advantages:
  • Different Flavors: There are endless amounts of meal combinations one can come up with, which means a more tasty and varied eating experience.
  • Packaging: While I use Hefty brand ziplock bags, these could be stored in whatever you can fit in your pack.
  • Customization: Gluten free? No Problem! Like it salty? Go for it! Make these meals how you want them.
Making homemade backpacking meals is easier than it might seem. I’ll break it down into four main parts below, then run a cost analysis of every part.

Base

Any kind of starchy food can work here, including rice, noodles, pasta, etc. The only requirements are that they cook fast and don’t poke holes through your packaging! (More on this later).

I decided on using three different bases in my meals — linguine, Thai rice noodles, and white rice.

All of these were relatively cheap as I ended up buying in bulk on Amazon for less than $1 per serving!

Vegetables

Of all the ingredients in this list I was most excited to customize my meals with freeze dried vegetables. I found a company called Harmony House, which specializes in creating packaged freeze dried vegetables for backpackers and campers. Harmony House makes kits that include a variety of vegetables and beans, one of which even won the Editor’s Choice Award from Backpacker Magazine.

While I used them solely for backpacking, I can see how these would be very useful for an office snack, or to spice up a simple meal in the dorm room.

While I was really excited and pleased to use the freeze dried veggies, to save even more money in the long run I would recommend buying a dehydrator and using fresh veggies in bulk. The dehydrator should pay itself off in no time, as the freeze dried alternatives aren’t that cheap.

Meat

While there are a variety of companies that make different freeze dried and dehydrated meats for backpacking, I decided to go with Mountain House’s large can of diced chicken. My hiker in crime (read, girlfriend) is not a fan of beef and I cannot stand tuna for the life of me, so chicken was our only easy choice.

If I were to hike alone or go with a different group I would be interested in trying some recipes that called for beef or something even more exotic.

Each recipe I used called for around 1/2 cup of chicken, which made for very easy meal prep.

Spices

While rice and chicken is not so bad by itself, adding a variety of spices really changes things. From cumin seed and pine nuts to cinnamon and ginger root, the list can go on and on. This is where the customization of homemade backpacking meals really shines, and it is here where you have the power to make the meals the way you want.

I was lucky enough to be able to use some of my parent’s spices while I was home prepping for the upcoming trip.

After combining the base with the meat, vegetables, and spices you’re pretty much ready to go. Just put them in easy to store bags — I used ziplock freezer bags — and do some meal planning.

Serving them is as simple as:
  1. Boil water.
  2. Add to bag (or add contents of bag to water, depending on your setup).
  3. Wait 5-10 minutes.
  4. Enjoy!

Backpacking Meals Price Breakdown


Although saving money was one of the original reasons why I decided to make my own backpacking meals, it was not the only reason. Along with saving weight, having more resourceful packaging, and the sheer fun of making my own food, I was very interested to see how the price difference would turn out.

I posted my initial setup to Reddit, and user /u/cornered_crustacean completed a price breakdown, which can be seen below:
  • $12.99 for rice (72 oz, 44 servings), $14.31 for noodles (6 x 14 oz, 42 servings), $17.35 for linguini (6 x 12 oz, 36 servings).
  • $53 for the box of veggies, 70 servings
  • $40 for the can of chicken (17 oz), 14 servings
  • Spices? You probably have these, but $25 will get a starter set
So with my crappy rounding and estimating:
  • Starch: $0.37 per serving
  • Veggies: $0.75 per serving
  • Chicken: $1.14 per serving
  • Spices: $0.35 per serving (scaled to 70 servings)
A total of  $2.61 per serving.

Pre-made Mountain House meals:

  • Mountain House, Chicken Teriyaki with Rice: $24.36 for 10 servings. Equates to $2.44 per serving.
  • Mountain House, Beef Stroganoff: $23.47 for 10 servings. Equates to $2.23 per serving.
  • Mountain House, Spaghetti with Meat Sauce: $21.51 for 10 servings. Equtes to $2.15 per serving.
  • Mountain House Essential Bucket: $61.51 for 32 servings. Equates to $3.33 per serving.
  • While I will admit that the actual savings ended up being little compared to the price of buying the prepackaged Mountain House meals, the flexibility of making my own food, the convenience of packaging it how I like, and the fun I had creating them all made it well worth it in the long run.
With the lessons learned from doing this for the first time, I am confident that I would be able to lower the price even more the next time I decide to make these meals.

Post Trip Report

As I mentioned earlier, these meals were created for a trip across the U.S.

Seven National Parks and many homemade backpacking meals later I can say that this was a success. I had very few issues and most of the meals cooked well and tasted amazing! While I am not sure if hiking for 10 miles through mountainous terrain makes everything taste better (it does), I can confidently say that I will be using this method from now on whenever I go backpacking.

While the meals mostly turned out great there were still some issues that came up.

Always assume the base requires more time than it claims

For instance: The Asian rice noodles I used for many of my meals took way longer than I thought they would to cook. I believe it was partially due to the altitude I was at (over 9,000 feet), but even after 20 minutes of cooking in the bag, and with the meal becoming less warm by the minute, I succumbed to eating hard noodles. Luckily this did not happen with the rice or pasta noodles.

More Salt

While I originally thought the combination of spices would make the flavoring sufficient, I found it a common theme that the meals tasted as if they could be significantly improved with another teaspoon or so of salt. Along with being a crucial ingredient in remaining hydrated, the extra sodium would have been a welcome addition.

Less Pokey, More Round-y

I made the mistake of ordering thin, sharp noodles to use as the base for some of my meals. Along with them being hard and unable to cook thoroughly, they also had the property of being incredibly sharp. I discovered this when I went to pour boiling water into the bag and some of it seeped through holes, giving me a delightful surprise on my thighs. A lesson here would be to buy less sharp noodles; luckily I had no issue with the pasta noodles nor the rice.

Your Eyes Are Bigger Than Your Stomach

Seriously. For almost every single meal we had lots of left overs. Even after hiking for 8+ hours a day and having nothing but snacks throughout the hike, we were never able to properly finish a meal. I’m 6’3” and am able to put away a double bacon cheeseburger like nothing, but that big bag of fiesta chicken proved too much for me to handle.

Post Trip Report

As I mentioned earlier, these meals were created for a trip across the U.S.

Seven National Parks and many homemade backpacking meals later I can say that this was a success. I had very few issues and most of the meals cooked well and tasted amazing! While I am not sure if hiking for 10 miles through mountainous terrain makes everything taste better (it does), I can confidently say that I will be using this method from now on whenever I go backpacking.

While the meals mostly turned out great there were still some issues that came up.

Always assume the base requires more time than it claims

For instance: The Asian rice noodles I used for many of my meals took way longer than I thought they would to cook. I believe it was partially due to the altitude I was at (over 9,000 feet), but even after 20 minutes of cooking in the bag, and with the meal becoming less warm by the minute, I succumbed to eating hard noodles. Luckily this did not happen with the rice or pasta noodles.

More Salt

While I originally thought the combination of spices would make the flavoring sufficient, I found it a common theme that the meals tasted as if they could be significantly improved with another teaspoon or so of salt. Along with being a crucial ingredient in remaining hydrated, the extra sodium would have been a welcome addition.

Less Pokey, More Round-y

I made the mistake of ordering thin, sharp noodles to use as the base for some of my meals. Along with them being hard and unable to cook thoroughly, they also had the property of being incredibly sharp. I discovered this when I went to pour boiling water into the bag and some of it seeped through holes, giving me a delightful surprise on my thighs. A lesson here would be to buy less sharp noodles; luckily I had no issue with the pasta noodles nor the rice.

Your Eyes Are Bigger Than Your Stomach

Seriously. For almost every single meal we had lots of left overs. Even after hiking for 8+ hours a day and having nothing but snacks throughout the hike, we were never able to properly finish a meal. I’m 6’3” and am able to put away a double bacon cheeseburger like nothing, but that big bag of fiesta chicken proved too much for me to handle.